Friday, May 7, 2010

Tutorial: Here's Lookin' at You Eye Patch


I have too many good jeans and pants that give in the knees well before their time. I did try the iron-on jean material patches only to be disappointed that the patch either fell off or was ripped off by restless fingers before the day was over.

Another problem was trying to use my Steam-A-Seam to cover a hole. Inside the fusible web left a sticky or scratchy surface and bothered little knees. So I came up with the idea of doing a reverse appliqué, appliqué. Or as I like to call it, an Eye Patch.

This patch was WELL received and even though I hadn't washed the pants yet (yeah, I know, I should have done that first), the jammies were off and these were on before I could mention the washing machine.

I think they go really well with an alien graphic t-shirt, don't you? My little one picks out his own clothes most of the time. As an aside on that subject, I heard a mother at the playground once declare that her son was absolutely NOT going out of the house with his red ball cap on (it would clash with his green and yellow complete John Deere outfit)! Seriously chick, get a grip.

Whooo, I'm back. (slapping face) I can't get on the subject of playground mommies. I do like the nanny that comes with her charge, though. She keeps it real.

Well, let's get on with the tutorial, shall we? I know you are ALL wanting to make some eye patches for yourself, so without further ado, here it is:

Tutorial: The Eye Patch

Step 1: Find a hole. (I couldn't resist)


Step 2: Download a copy of my eyeball cutouts, or draw some eye elements onto your fusible web.


Step 3: Apply the pattern onto the main patch fabric. I'm using a red patch as a base for my eyeballs. If you are a little confused by this step, please refer to my tutorial on how to appliqué using a fusible web by clicking on this link.


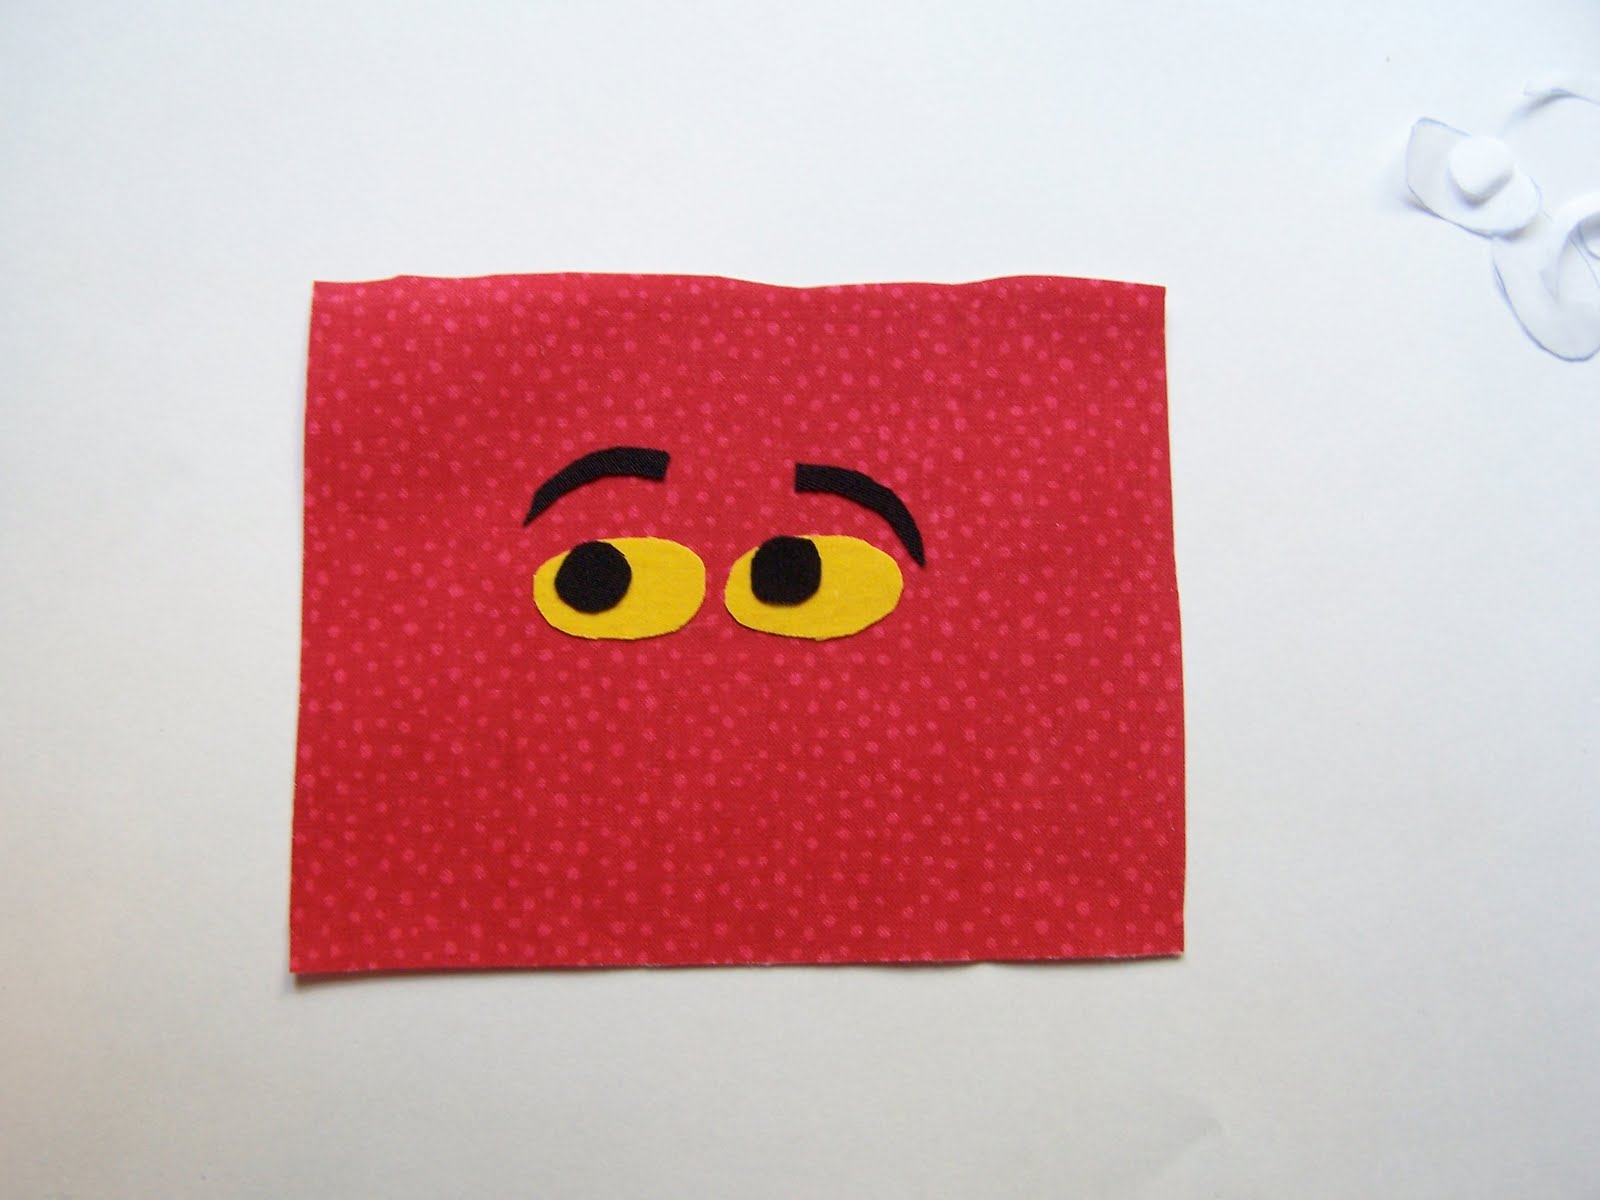
Step 4: Iron on your pieces and allow to cool. Make sure these guys are on really well. Once he's on the jeans, I'm sure he'll be taking a lot of face-plants into the ground.


Step 5: Carefully insert the entire patch into the pants leg, centering your eyes directly underneath the hole. Make sure the fabric is flattened down. See him peeking out? That's what you want.


Step 6: We needed to make sure the eyes were in the right spot because for this step, we need to pin down the patch all around the opening of the hole. I'd place the pins a little inside of the good fabric, on top of where it's starting to wear away.


Step 7: Now here's where we reverse appliqué the appliqué (say that 10 times fast). I like to use a small embroidery hoop on this so the fabric layers won't slip and slide around as I sew.


Step 8: Secure your fabric and trim away any excess or stray jean/pants threads. Get out an embroidery needle and some floss. I did an organic sort of circle around the eyes. No need to be perfect. I used this basic back stitch, making sure to knot my thread securely when complete.


Here's what he looks like after the embroidery. Isn't it nice when wiggly lines actually look good?


With the pants leg turned inside out, you can see that there are places where I had to 'reload' my needle and a couple of knots. This brings us to step 9...


Step 9: To make sure that my knots will not come undone and to clean up the backside a little, I put a few scraps of fusible web onto small strips of fabric and bonded those strips to my knots (see the three knot areas?). This way, the fabric strip on the top is permanently bonded with the thread and fabric underneath. Now I don't have to worry about anything coming loose. Carefully trim around your stitching, leaving .25" or .125".


Step 10: Last step! Now we need to free out little monster and give him (or his eyes at least) room to breathe. I like using a seam ripper for this job. Just pierce the worn fabric with a seam ripper and follow the stitch line all the way around the circle, leaving .25" or .125" of fabric.


You're finished! Now go take him out on the town and have some fun.

I really hope you'll give this a try, you won't be sorry! Be creative with your reverse appliqué and there will be smiles all around.


This is just a friendly reminder to you all to:

Thursday, May 6, 2010

Project: How to Get Dinner on the Table

I've always felt that it is extremely important to involve children in the purchasing, preparing and serving of family meals. We love to shop together and I ask them questions about various fruits or vegetables (i.e. find the most red apple! Which one is softer?) and have them choose some. I try to involve them as much as I can with prep work, however, our kitchen is just too small sometimes to have both children at our tiny counter right next to the boiling water or bubbling oil. Eek.

So, sometimes we work at the kitchen table but lately, the little people have enjoyed bothering mom the most. It's their recreational sport. Only when I decide to start dinner. Only then. And when someone calls on the phone, or an adult tries to speak to me. Or when I go to the bathroom...

Anyway.

I decided on the spur of the moment to get out my craft rice. I have been making some scented eye pillows lately (recipes and pattern from this book), and had a big bag of uber cheap rice in my closet. So, out came the sheet cake pan, some spoons and cups et voilá! Forty-five minutes of cooking time with only two sweep ups back in the pan.


The last spill was really colossal (courtesy of Little Ms. A) and as they tried to sweep up the grains, they ended up sweeping the rice in all directions. What was I to do? As always, I put them to work.


I think the thing I like most about the above picture is her pacifier. She's not supposed to have it during the day but, meh, I picked my battles that day.


And THAT'S how Mama got dinner on the table. Well, it worked this one time anyway.

Monday, May 3, 2010

Giveaway: Because You ROCK!


Yo.

Remember back when the bigger was better? If the boom box completely outsized the person carrying it, then they were the COOLEST person around. Rad. Wicked.

I think I went waaaaaay over the top with all the little small pieces in this appliqué but I think it's 'da bomb. Heh heh. I went nuts putting on all the little finishing touches, but I really love this boom box.

And ... drumroll please. I'm going to Give. It. Away! I can't think of anything better than honoring a mother on Mother's Day with a ginormous boom box to splash across her chest. Can you?


But wait! There's more. Along with this women's cotton t-shirt (size medium), you'll receive a boy's size xs (5-6) t-shirt as well.

The winner of the mother and son shirts will be awarded on Mother's Day by random drawing. Please leave a comment and a way for me to contact you to be eligible. That's it!

Happy Mother's Day everyone!

Thursday, April 29, 2010

Cuteness: Sam

Introducing, Puddle Jumping in action! These designs are meant to get dirty and have fun with the wearer. Here's Sam in the a cute vintage pickup shirt his mom made at the appliqué party:


Give one a try for yourself!

Thursday, April 22, 2010

Appliqué Party: Chattanooga

Well, this winter/spring has turned into quite the crazy schedule for me. Many profuse apologies to those of you who might have checked back a few times in these past months only to see the same, sad post staring back at you.

Life happens and I chose to put family and work ahead of everything else in order to maintain some sort of sanity. Pairing priorities down to the bare bones when life's schedules get crazy really helps. However, designing and blogging was truly missed! I also have a lot of blog reading to catch up on.

Anyhoo, on to the MAIN EVENT. I am so excited to say that I recently got together with some dear friends for a girls weekend. Everyone agreed that they would like to try out appliqué so I brought my patterns, fabric scraps and Steam-A-Seam 2. The hostess provided the iron and scissors. Then we all went at it!

APPLIQUÉ PARTY 2010: CHATTANOOGA

Alas, since I had only one day in between traveling to pack for this trip, I forgot my decent camera. Also, we had this party at night. So, please excuse the picture quality, but I wanted you all to see how easy and fun it is to appliqué with this technique. NO SEWING REQUIRED.

Many of these girls are self-proclaimed non-sewers. They were wary of working with fabric as it conjured up visions of presser feet, bobbins, thing-a-ma-bobs and whatchamacallits. I promised them that this process was simple and once they understood the principles of working with the bonding agent, they would be masters.

It worked.

You can be as detailed as you like or keep the shapes simple. My recommendation is to just be creative. The designs definitely look better the more detailed you get, but you can either trace and cut out the small details provided on the patterns or use things like embroidery floss, fabric paint or buttons.

The first step is easy: cutting out the pattern pieces. Some are small, so we got out cereal bowls to put our cut pieces in to avoid them getting lost in our fabric mountain.


Here is a picture of some pattern tracing. The patterns are traced directly onto the Steam-A-Seam. We wanted to take advantage of space and materials so we tried to trace as many parts onto one sheet as possible. (Diet Dr. Pepper helped with our concentration.)


Christy, who had no former appliqué experience, really churned out the designs. I believe she won for most appliquéd patterns in one night. Here she is assembling her Vintage Truck in layers onto her onesie before using the iron to bond them all together:


Appliqué Party Results:


Every person there was super excited about the appliqué patterns and vowed to do it again. One girl even plans on hosting an appliqué party for her womens' group at church. Another still self proclaimed non-sewer is making plans for more appliquéd outfits for her boys.

Sooooo, that brings me to my next point. You really should try out appliqué. Click on the How to Appliqué button at the left or click on this link. The tutorial is truly step by step and will guide you through the entire process. Visit the shop by clicking on the button at left or on this link. There you will find many patterns to choose from!

As always,

Sunday, March 7, 2010

Project: Play Room Bins


Wow, I didn't expect to be gone longer than a week but here we are. I apologize if you happened back once or twice only to be confronted with the same old post. I was planning on posting while I was gone this past week to an out of town meeting but it didn't go as well as we had hoped. Sigh.

So, needless to say I've been really thinking about things other than work. One of the big things on my list has been reorganizing what used to be our spare bedroom into a play room. Wanting to take back our living room, this was our way of sequestering the toys into one space.

This is what the room looked like one we cleaned everything out:

We had taken out a full bed, a night stand and a dresser and I was in the middle of reclaiming the closet when I decided to snap this shot. I was beyond excited to get this room back into a functional space again (we don't always have overnight guests and when we do, they end up in our bed!).

I added a few shelves and some cubby shelving I purchased on clearance and, VOILA!, here is our playroom now:

Yes, it is still messy, but it is a controlled mess. This was after a day of playing. Isn't it fun? I wasn't sure about the natural wood look of the cubbies below the white shelves, but I really think it works. I'm not a matchy-matchy person at all so this suits me just fine.

This room is a work in progress so I'll be revisiting this room once in a while to show you something else we've done. We are so short on space in our house so I am trying to be extra creative in how we organize our stuff. (My son is still wondering what happened to his oversized, plastic workbench. It took up so much room that I thrifted the piece in a second hand shop. Too bad the kid is so perceptive.)

In order to have some catch-all bins to corral the little toys, I found this fab tutorial from an awesome lady who, sadly, is no longer blogging. She is leaving up her blog for a while though, so hop on over there while you can to check out her tutorial on how to craft fabric bins.


Instead of putting the label on the front of my bins, I opted for a handle. I measured the cubby size and made a bin that just fits! It's better than being a little too large and I've been down that sad road before. More than once.


With the repurposed cardboard inserts, the bin is really sturdy. I made sure to use the heavy-weight fabric too in order to hold up to all the rough play.


So far I've just made two, but I have plenty of fabric to make more! I plan on making a few more to hold all the other little toys that seem to find their way to the floor...

Friday, February 26, 2010

To Market: Dear Deer

So, I never thought I end up doing a sort of shopping post, but it seems natural at this point. I will occasionally spend a lot of time perusing, tagging and bookmarking items that are really unique or catch my eye in some way and I thought it would be a good time to share with everyone.

Instead of just putting up some of my favorite Etsy finds in a sort of collage, I'd really like to point you all to those particular vendors who make or supply these wonderful items via a direct link. I will apologize in advance if some of the items are not available or the links no longer work. Because of their pure awesomeness, these items will, quite likely, already be sold and gone.

Le sigh.

So, with that, I present today's to Market as Dear Deer. We are a hunting household. Well, I take that back, my HUSBAND is a bow hunter and is pretty eaten up with it. Subsequently, my son is a bow hunter in training. Anything that has to do with deer, the forest or hunting, he loves. My daughter just likes to do anything that her brother does.

So, we like nature, animals and most of all, deer. Now, don't get me wrong, we don't glorify massive innocent animal bloodshed in our house. It's quite the opposite. My husband is really good about teaching respect to nature and to animals. My son, at an early age, understands that you should only take what you can eat and not just kill for the sake of killing because as he says, "Animals need their mommies and daddies too."

ANYHOO ... I digress. May I present...


Happy Friday!